How to Install Blinds and Shades
Installing blinds or shades in your home may seem like a daunting task. Blinds.com is here to make it easy with our Installation Guide!
Keep in mind that the steps in this guide provide a general overview of installing blinds. Depending on your specific product, your installation instructions may vary. Always refer to your specific product for precise installation instructions.
Consult a Professional
Not a DIY person? No need to worry - Blinds.com has professionals waiting to help you with measuring and installation. Click here or call us at 800-689-4496 to find a local professional.
What You Will Need
- Steel Measuring Tape
- Step Ladder (if necessary)
- Screwdriver or drill
- Level tool
Helpful Hints Before You Begin:
- For the most accurate measurements, only use a steel tape measure.
- Your window measurements should have accounted for either an inside mount or an outside mount. An inside mount is installed inside the window recess and provides a clean, finished look. An outside mount rests above the window and covers the entire frame.
- Double check all packaging and make sure you received the correct number of screws, mounts, and hardware with your order before you begin installing.
How to Install Inside Mount Blinds or Shades
The installation process for inside mount blinds may vary slightly depending on your product. These general steps provide an overview for installing inside mount blinds, but always refer to the manufacturer instructions for details specific to your product.
- Position the first bracket in the upper corner of the window frame so that it's level with the wall's surface. Always check your specific product instructions for the exact placement of the brackets. If your blinds came with a decorative valance, you will need to set the brackets further back into the window opening to allow room for the valance.
- Mark the screw locations with a pencil.
- Repeat steps 1 and 2 with the second bracket in the opposite corner of the window frame. If you're mounting into drywall with no studs behind, you will need to use drywall anchors.
- Use a steel tape measure or a level tool to ensure the two bracket locations are even.
- Use a drill bit - smaller than your screws - to drill pilot holes through your bracket marks.
- Screw the brackets in place.
- Install your blinds by sliding the headrail into the brackets, and close the brackets to secure the headrail in place, or snap the headrail into the brackets for other styles.
- Test your blinds by lowering, raising, and rotating them to ensure all parts are functional.
How to Install Outside Mount Blinds or Shades
The installation process for outside mount blinds may vary slightly depending on your product. These general steps provide an overview for installing outside mount blinds, but always refer to the manufacturer instructions for details specific to your product.
- Position the first bracket in the upper corner of the window frame so that it's flush with the wall's surface. Always check your specific product instructions for the exact placement of the brackets.
- Mark the screw locations with a pencil.
- Repeat steps 1 and 2 with the second bracket in the opposite corner of the window frame. If you're mounting into drywall with no studs behind, you will need to use drywall anchors.
- Use a steel tape measure or a level tool to ensure the two bracket locations are even.
- Use a drill bit - smaller than your screws - to drill pilot holes through your bracket marks.
- Screw the brackets in place.
- Install your blinds by sliding the headrail into the brackets, and close the brackets to secure the headrail in place, or snap the headrail into the brackets for other styles.
- Test your blinds by lowering, raising, and rotating them to ensure all parts are functional.
Blinds.com SureFit™ Guarantee
Blinds.com offers an exclusive SureFit™ Guarantee. We make sure you have complete peace of mind when measuring for any product we offer.
If you made a mistake measuring your blind, we’ll remake it at no cost to you. You don’t even pay for the return shipping of your old blind! You only pay if there’s a difference in price between your old and new blind, or if the new blind requires a shipping fee (generally, this applies when it’s over 94" wide).
Important Disclaimer:
- Limit 1 remake per item; 4 item remakes per household per lifetime (unless the error is ours, in which case, we’ll make it right!).
- Same-product exchanges only, within 30 calendar days of receipt of package.
- Changes are restricted to size and mount only.
- Refunds are not offered under this guarantee.
Not covered under this guarantee:
- Commercial orders: any order containing 25 or more of the same product, of tax exempt status, or containing any Blinds.com Commercial brand product.
- Any product ordered outside our recommended sizes or specifications, which can be found on the product page.
Blinds.com makes it easy to install new Quick Ship Blinds or Shades. Follow our Quick Ship Blinds and Shades Installation Guides for step-by-step instructions.
Quick Ship Blinds Installation
Follow our How to Install Quick Ship 2” Faux Wood Blinds guide for step-by-step instructions – soon you’ll have the look of real wood blinds in your home, with added durability against heat and moisture.
How to Install Inside Mount Blinds.com Quick Ship Blinds
If you measured for inside mount blinds, follow these simple installation steps:
For 2 inch Faux Wood Blinds
- Slide the mounting brackets on each end of the blind headrail. Then position the blind in the window and align-center marks. Mark the position of your mounting brackets with a pencil. Remove mounting brackets from the blind If your blinds come with a decorative valance, set the brackets further into the opening to leave room for the valance to sit.
- To make it easier to fasten your screws, create starter holes by tapping a screw with a hammer or using a drill bit.
- For Pre-drilling holes with a 1/16-inch drill bit. Align with holes in the brackets and attach them to the window frame using large screws. Choose 2 diagonal holes that work best for your window frame.
- Slide the center bracket onto the headrail from the back of the blind. Temporarily hang your blind by sliding the headrail into attached mounting brackets. Mark the location of the center bracket a with a pencil. Remove the blind and center bracket.
- Align the center bracket with your pencil marks and attach it using the large screws; Pre-drill holes with 1/16 inch drill bit. Next, hang your blind and snap the locking tab of the mounting bracket.
- Attach the valance clips to the blind headrail. Install the wand to the wand hook attached to the blind headrail.
- Now, slide the valance onto valance clips as needed to center your valance.
- Test your new blinds. Raise and lower your blinds and tilt your slats by either adjusting the tilt cord or rotating the wand.
For 2 inch Vinyl Blinds
- Clips the mounting brackets onto the headrail. Hold blind in place and make a pencil mark at the rear of each bracket. Remove the brackets from the headrail.
- Secure brackets to window frame using screws. Use both bracket holes.
- Lift headrail into position such the inner front edge of the headrail slides into the slot at the front of each bracket.
- Push the headrail upward until the flexible tab at the bottom of each bracket snaps into place.
- Install wand by gripping and pulling the wand tilter, located on the left side of the blind, and hook wand into the tilter.
- Test your new blinds. Raise and lower your blinds and tilt your slats by either adjusting the tilt cord or rotating the wand.
How to Install Outside Mount Blinds.com Quick Ship Blinds
If you measured for outside mount faux wood blinds, follow these simple installation steps:
For 2 inch Faux Wood Blinds
- Mark the center of the window opening and center of the blind with a pencil.
- Slide the mounting brackets on each end of the blind headrail. Then position the blind on the wall, and align center marks. Mark the position of your mounting brackets with a pencil.
- make it easier to fasten your screws, create starter holes by tapping a screw with a hammer or using a drill bit.
- Now, remove mounting brackets from the blind. Pre-drill holes with a 1/16-inch drill bit. Align with holes and attach them to the wall using large screws. Choose 2 diagonal holes that work best for your window frame.
- Slide the center bracket onto the headrail from the back of the blind. Temporarily hang your blind by sliding the headrail into attached mounting brackets. Mark the location of the center bracket a with a pencil. Remove the blind.
- Align the center bracket with your pencil marks and attach it using the large screws; Pre-drill holes with 1/16 inch drill bit. Next, hang your blind and snap the locking tab of the mounting bracket.
- Attach the valance clips to the blind headrail. Install the wand to the wand hook attached to the blind headrail.
- Now, slide the valance onto valance clips as needed to center your valance.
- Attach valance end caps by inserting valance endcaps into ends of the valance.
- Test your new blinds. Raise and lower your blinds, and tilt your slats by either adjusting the tilt cord or rotating the wand.
For 2 inch Vinyl Blinds
- Hold blind in place where it will equally overlap the window on each side and mark each side with a pencil.
- Clip the mounting brackets onto the headrail. Hold blind level within the outer marks and mark the exact location of each bracket.
- Remove brackets from headrail.
- Pre-drill holes with a 1/16-inch drill bit.
- Secure brackets to the wall or window molding.
- Lift headrail into position such the inner front edge of the headrail slides into the slot at the front of each bracket.
- Push the headrail upward until the flexible tab at the bottom of each bracket snaps into place.
- Install wand by gripping and pulling the wand tilter, located on the left side of the blind, and hook wand into the tilter.
- Test your new blinds. Raise and lower your blinds and tilt your slats by either adjusting the tilt cord or rotating the wand.
Quick Ship Shades Installation
Blinds.com makes it easy to install new shades. Follow our How to Install Quick Ship Shades guide for step-by-step instructions.
How to Install Inside Mount Blinds.com Quick Ship Shades
If you measured for inside mount shades, follow these simple installation steps:
For Cellular, Pleated and Roman Shades
Clip brackets onto the headrail. Hold the shade level in place and make a pencil mark at the rear of each bracket where it contacts the window frame. A mounting bracket should be positioned about 1 to 6 inches from each end of the headrail. Wider shades that require 3 or more brackets should be spaced evenly between the 2 outermost brackets. Always position the brackets so there is no interference with the cords and/or mechanisms inside the head rail. The procedure outlined below will assure proper bracket placement.
1. Clip brackets onto the headrail. Hold the shade level in place and make a pencil mark at the rear of each bracket where it contacts the window frame.
![how to snap headrail into brackets]()
2. Remove the brackets from the headrail.
3. To make it easier to fasten your screws, create starter holes by tapping a screw with a hammer or using a drill bit.
4. For Pre-drilling holes with a 3/32-inch drill bit. Align with holes in the brackets and attach them to the window frame using 1 inch screws.
5. Once brackets are installed, lift the headrail into position such that the front edge of the bracket is under the inner front edge of the headrail.
6. Push upward until the flexible tab at the bottom of each bracket snaps onto the back of the headrail.
7. Check to carefully to assure each bracket is properly secured.
8. Attach handle to the bottom of the shade. (Handle is designed to minimize contact with shade fabric) Wider shades have 2 handles. Top Down Bottom Up Shades will require handles on the center operable rail to allow top down operation.
Roman Shades
![attaching handles for roman shades]()
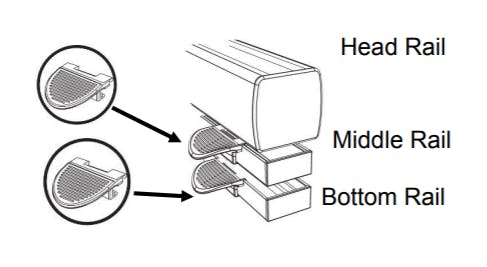
Top Down Bottom Up Shades
![attaching handles for top-down bottom-up shades]()
9. Test your new shades. Slowly raise and lower your shade using the handles to multiple height positions.
How to Install Outside Mount Blinds.com Quick Ship Shades
If you measured for outside mount shades, follow these simple installation steps:
For Cellular, Pleated and Roman Shades
Clip brackets onto the headrail. A mounting bracket should be positioned about 1 to 6 inches from each end of the headrail. Wider shades that require 3 or more brackets should be spaced evenly between the 2 outermost brackets. Always position the brackets so there is no interference with the cords and/or mechanisms inside the head rail.
1. Clip brackets onto the headrail. Hold the shade level at the height desired and center it over the window opening. Mark the exact location of each bracket with a pencil.
![how to snap headrail into brackets]()
2. Remove the brackets from the headrail.
3. To make it easier to fasten your screws, create starter holes by tapping a screw with a hammer or using a drill bit.
4. For Pre-drilling holes with a 3/32-inch drill bit. Align with holes in the brackets and attach them to the window frame using 1 inch screws.
5. Once brackets are installed, lift the headrail into position such that the front edge of the bracket is under the inner front edge of the headrail.
6. Push upward until the flexible tab at the bottom of each bracket snaps onto the back of the headrail.
7. Check to carefully to assure each bracket is properly secured.
8. Attach handle to the bottom of the shade. (Handle is designed to minimize contact with shade fabric) Wider shades have 2 handles. Top Down Bottom Up Shades will require handles on the center operable rail to allow top down operation.
Roman Shades
![attaching handles for roman shades]()
Top Down Bottom Up Shades
![attaching handles for top-down bottom-up shades]()
9. Test your new shades. Slowly raise and lower your shade using the handles to multiple height positions.